")
Received your acceptance letter from your dream university is a whole lot of excitement. But hang on before you pack your bags, there’s one crucial step you can’t skip, your student permit. That’s right, securing permission to live and study in your host country isn’t just paperwork, it’s your ticket to a smooth academic adventure abroad.
In this guide you’ll find clear, step-by-step advice on everything from choosing the right permit type to registering with local authorities once you arrive. You’ll learn what documents you need, how to navigate appointments, and common slip-ups to dodge. By the end, you’ll feel totally ready to tackle the permit process with confidence. Let’s dive in.
Understand student permits
What’s a student permit?
A student permit (sometimes called a residence permit) is official authorization that lets you stay in a European country for study. It’s more than just a visa sticker in your passport many countries issue a separate ID card once you arrive.
Why you need one
- Legal status: studying on a short-term tourist visa can get you deported
- Access to services: open a bank account, use student health plans, sign a rental lease
- Work rights: many permits let you do part-time jobs to cover living costs
Permit versus visa
You often apply for a visa first (Type D or long-stay) at your local consulate. After entry, you convert that visa into your actual student permit. Think of the visa as your boarding pass and the permit as your season ticket.
Pick your permit type
Here are different types of student permit to stay in Europe:
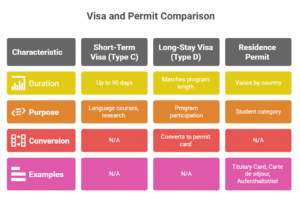
Short-term versus long-term stays
- Short-term visa (Type C) covers up to 90 days, mostly for language courses or research
- Long-stay visa (Type D) usually matches your program length, then turns into a permit card
Residence permit categories
Each country has its own names “Titulary Card” in Spain, “Carte de séjour” in France, “Aufenthaltstitel” in Germany but they work similarly. You’ll pick the student category.
When to apply
You can often apply up to six months before your course starts, but never later than the date your visa interview is scheduled. Starting early gives you breathing room.
Prepare required documents
Getting your paperwork in order is half the battle. Requirements vary, but here’s the core list you’ll see again and again.
Proof of acceptance
- Official admission letter from your university
- Program details (duration, start/end dates)
Financial means
- Bank statements showing sufficient funds (amount depends on country)
- Scholarship award letters or sponsorship confirmation
Health insurance
- Private or public policy covering medical emergencies and repatriation
- Minimum coverage amounts differ by country (often around €30,000)
Accommodation proof
- Dorm confirmation, rental contract, or host family statement
- Some places accept a hotel booking followed by your lease once you arrive
Additional country-specific documents
- Criminal record check or police clearance
- Language certificate (if required)
- Medical certificate or vaccination record
Complete the application process
Fill out the application form
Most countries offer an online portal. Create an account, upload digital scans of your documents, and save a PDF of your completed form.
Schedule your appointment
Book a slot at the embassy or visa centre. Slots fill fast in peak season aim for at least eight weeks before departure.
Pay the application fee
Fees usually range from €60 to €120. You’ll pay online or at the embassy when you submit your packet. Keep the receipt it’s proof of payment.
Attend your visa appointment
Prepare your interview
- Arrive early with your form, passport, photos, and original documents
- Dress neatly and bring a pen for on-the-spot notes
Documents to bring
- Passport valid for at least six months beyond your program end date
- Completed application form and fee receipt
- Originals plus photocopies of your acceptance letter, financial proof, insurance, and accommodation proof
After the interview
Most visa decisions take two to four weeks. You’ll get your passport back with a sticker visa check all details before you leave the consulate.
Travel and register on arrival
Entry timeline
You can enter up to 90 days before or up to 30 days after your program begins, depending on the country. Check your visa’s validity window.
Register with local authorities
Within one week of arrival, most countries require you to show up at the town hall or foreign office for registration. Bring:
- Passport with visa sticker
- Completed local registration form
- Proof of address (rental agreement or dorm letter)
Collect your permit card
After registration, you’ll get an appointment to pick up your residence card often within two to four weeks. Treat it like your ID, carry it on campus, and store it safely.
Maintain permit compliance
Stay enrolled full time
Dropping below your program’s minimum credits can void your student permit. Speak to your international office before any course changes.
Follow work limits
Many permits cap you at 20 hours per week during term, full-time in vacation breaks. Unauthorized work risks immediate permit cancellation.
Renewing your permit
Start the renewal process at least two months before expiration. Requirements resemble your initial application proof of enrollment, financial means, and insurance.
Handle common pitfalls
Avoid application mistakes
Let’s be honest, missing a checkbox or flipping a signature can delay you weeks. Review your packet carefully and download our step by step guide for student permit before you submit.
Dealing with delays
If processing drags past your travel date, contact the visa centre or your university’s international office. They often have liaison channels.
Lost or stolen permit card
Report to local police immediately, then book an appointment at the immigration office for a replacement. Expect a fee and a short waiting period.
Explore country-specific steps
Each European country tweaks the process slightly. Here’s a quick reference table linking to 2026 checklists that’ll walk you through local quirks.
For an overview that covers every European nation’s basic requirements, don’t miss our student visa application checklist.
Next steps and resources
Useful internal guides
- Need a deep dive on application steps go here: step by step guide for student permit
- Want to sidestep common slip-ups? Check common mistakes on student visa applications
Official resources
For up-to-date rules, always double-check your host country’s immigration website or contact the nearest consulate. Regulations shift frequently, and you want to stay ahead.
In summary
You’ve got the roadmap, the checklists, and the insider tips to tackle your student permits like a pro. Now it’s time to gather your documents, book that embassy slot, and cross your first big prep off the list. Once your permit is in hand, Europe’s classrooms, cafes, and cobblestone streets await. Safe travels and happy studying drop a comment if you’ve got questions or tips of your own, and share this guide with fellow future expats!